[Kubeflow Notebooks] Container Images
2022. 12. 15. 22:01ㆍ[개발] 문서 번역/Kubeflow
Kubeflow 노트북은 기본적으로 세 가지 타입(JupyterLab, RStudio, and Visual Studio Code (code-server))의 노트북을 제공합니다. 그러나 어떠한 웹 베이스의 IDE도 동작이 가능합니다. 노트북 서버는 쿠버네티스 Pod의 컨테이너로써 구동됩니다. 그렇다는 것은 IDE 종류는 사용자가 선택한 도커 이미지에 의해 결정된다는 것을 의미합니다.
Images
수 많은 예제 이미지 가 준비되어 있습니다.
Base Images
이 이미지들은 Kubeflow 노트북 컨테이너를 위한 공통 스타팅 포인트를 제공합니다. 당신의 고유 패키지로 확장하려면 custom images를 참고하세요.
| Dockerfile | Registry | Notes |
|---|---|---|
| base | https://gallery.ecr.aws/j1r0q0g6/notebooks/notebook-servers/base | common base image |
| codeserver | https://gallery.ecr.aws/j1r0q0g6/notebooks/notebook-servers/codeserver | base code-server (Visual Studio Code) image |
| jupyter | https://gallery.ecr.aws/j1r0q0g6/notebooks/notebook-servers/jupyter | base JupyterLab image |
| rstudio | https://gallery.ecr.aws/j1r0q0g6/notebooks/notebook-servers/rstudio | base RStudio image |
Full Images
이 이미지들은 데이터 사이언티스트, ML 엔지니어를 위한 공통 패키지로 구성된 베이스 이미지를 확장한 이미지들입니다.
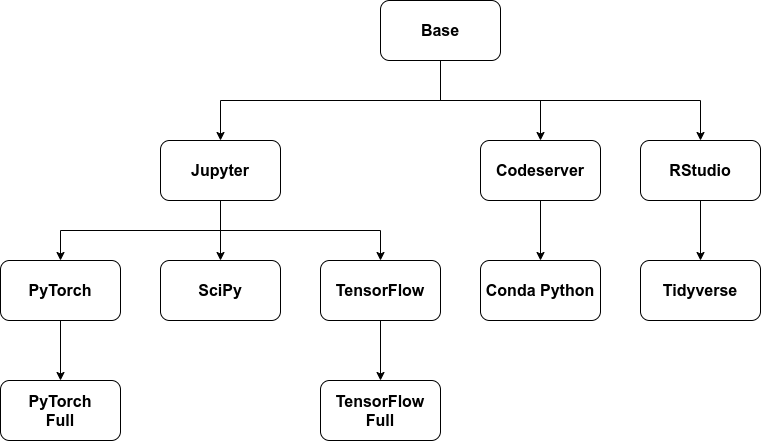
Image Dependency Chart
아래 플로우 차트는 노트북 컨테이너 이미지들이 서로 어떻게 의존하고 있는지를 나타냅니다.
Custom Images
Kubeflow 노트북이 만들어진 후 인스톨된 패키지들은 PVC 디렉터리에 설치되지 않는 한, Pod의 수명만큼만 지속됩니다.
Pod이 리스타트되어도 패키지들의 보존을 보장하려면 아래 조건중 하나가 필요합니다:
- 패키지를 포함하는 커스텀 이미지 빌드
- PVC 디렉터리에 패키지 인스톨
Image Requirements
Kubeflow 노트북이 컨테이너 이미지로 작동하려면 이미지는 아래와 같아야합니다:
8888포트에 HTTP 인터페이스를 노출- Kubeflow는 URL 경로로 런타임 하는 시점에
NB_PREFIX환경 변수를 세팅합니다. - Kubeflow는 IFrame을 사용하는데, 당신의 어플리케이션의 response 헤더에 Access-Control-Allow-Origin: * 가 있는지 확인해야 합니다.
- Kubeflow는 URL 경로로 런타임 하는 시점에
jovyan이라 불리는 사용자로 구동:jovyan의 홈 디렉터리는/home/jovyan이어야 합니다.jovyan의 UID는 1000이 되어야 합니다.
- 빈 PVC를 /home/jovyan에 마운트해서 구동
- Kubeflow는 Pod 재시작을 넘어 상태를 유지하기 위해 PCV를 /home/jovyan에 마운트합니다.
'[개발] 문서 번역 > Kubeflow' 카테고리의 다른 글
| [Kubeflow Pipelines] Introduction (1) | 2022.12.22 |
|---|---|
| [Kubeflow Notebooks] Troubleshooting (0) | 2022.12.21 |
| [Kubeflow Notebooks] Submit Kubernetes Resources (0) | 2022.12.20 |
| [Kubeflow Notebooks] Quickstart Guide (0) | 2022.11.24 |
| [Kubeflow Notebooks] Overview (0) | 2022.10.20 |
<